Wednesday, 25 September 2013

Day 10 - 3DD

 Task one was really interesting and fun today, was was given something to draw and then was given something else that we then had to turn that first thing into.


 Here we was asked to draw the pattern on the bottom of our shoe and then turn it into a piece of jewelry.


 Here was was told to write down our door number and then turn it into a bus stop

 we was then asked to draw our favourite fruit and turn it into a rabbit hutch
 here we was asked to draw 2 vertical lines, one diagonal and one horizontal line and then turn it into a shopping centre over head view.
 Here we had to draw 10 random dots then turn them into a floor plan of a 2 bedroom flat with a bathroom living room kitchen and hall way.
 Here we had to draw our favorite piece of clothing and then turn it into a light source.
Here we was told to draw a squiggly line and then turn it into something that would hold 2 people and a cat.

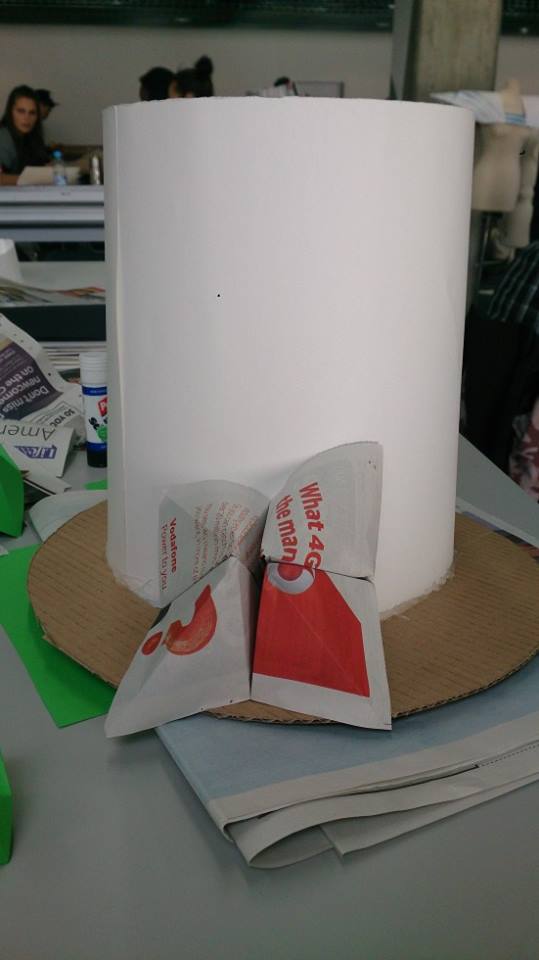
Our second task of the day was to create a paper model that would hold up a water bottle of the table, i decided to go with a strong origami chatter box for i knew it would be pretty strong and it also looks visually interesting. Here are some images of my water bottle holder, in these images i have played about with the lighting reflecting of my holder.


This is what happened when i placed the water bottle on to my paper bottle holder, it was not as strong as i thought it would be i think it would have been better if i had made more then 2 so that it was made up of layers and then it would have been alot stronger.But even though it did not work very well i am happy with my outcome because i feel that it does look really good and interesting i also think i should have added some colour so that it was more eye catching.


We was then asked to make some thing out of 4 pieces of card and masking tape that would hold our own body weight, i decided to partner up with someone so we then had 8 pieces of cardboard but out piece had to then hold both of our body weight.
We decided that we was going to make a table/chair that would be supported with 3 legs one each to sit on and the other leg to keep the balance.


Our piece also had to be able to fold away as small as possible, this is what our piece looked like when folded away, our piece was not very successful at being able to fold away very small, i feel that it we had been more careful at how we made the legs this would have been more successful.

                                           This is what our finished piece was when it was put up.


We was both able to sit on our piece, it help both our weight really well but it was not very balanced, it was really hard to stay on it for very long with our feet of the floor, but over all i think our piece was successful it was just not very visually nice.


Tuesday, 24 September 2013

Finished IT Poster


Day 7 - photoshop illustrator indesign.

Today we has to produce a A3 poster designs about memories.
it had to include some form of photographic image changed in some way using Photoshop, a headline text made in illustrator and a body copy being 100-200 words explaining what the poster is about.


This is the title that i have created for my poster, i did this by adding some simple text in to illustrator and thing changing the brush definition so that it looked like the writing was painted instead of typed and then i added some colour in to the text but keeping the outline of the text black.
I then made my background and images for the poster in photoshop, i did this by just simple adding my photos to the program and playing around with the cut out tools and shapes and then when i had found what i liked i then did the same cut shapes for my images.
Then using Indesign i added my background from photoshop and my title from illustrator together and then using indesign i made my body copy.
This is what my final Poster looks like, i am very pleased with my outcome, i really enjoyed this whole task it was a lot of fun getting to know how to use photoshop, illustrator and indesign even though it was very frustrating at times it is worth working your way through it. i think i will defiantly be using the programs in future.

Tuesday, 17 September 2013

Day 6- Fashion and Textiles

Our task today was to create a wearable piece from our initial designs, i decided to make a large top hat covered in chatterboxes, i decided to keep using the chatter boxes for i thought it would be a better idea then using something completely random.
i layered the hat up with 4 different size chatter boxes, as the hat got taller the chatter boxes got smaller and i also decided to use 2 different types of material one being card paper and the other being newspaper.


these images show how the paper hat was made, i found it easy to make the hat and chatter boxes but it was really difficult getting all the  chatter boxes to stick on to the hat for they all had to be covering each other and the size different made that very difficult but i did enjoy making the hat.


This is what my final hat looked like on a manikin.


Here are my final images.


over all i really enjoyed this task i found some parts easy and some parts very difficult, but i am happy with my over all outcome. and i really like the images that i have taken of my hat on a model.

Monday, 16 September 2013

Day 5 - Fashion and Textiles.

Our First task for today was to create a 2D garment on model from a magazine or the newspaper, we was asked to make 5 different garments.
This is a image of everyones work together on a board, i really like all of the pieces on the board they were all very eye catching and very different from eachother.


Here are the 5 garments that i made, i decided to use some of the small samples thats i had made yesterday on 2 of my 2D garments.which then made them 3D. I really enjoyed this proccess it was really good to see what different outcomes i had, and it was interesting to see how different mine was from everyone elses.


we was then asked to make 4 more but for these 4 we had to select a part of the body to work with, i decided to make head pieces for this could be anything from a hat to a pair of glasses or even both.